
Installing Flutter
- Download Flutter for Mac (check if you have Intel or Apple processor)
- Unpack it to directory D
- Set PATH to point to D/bin in .zprofile
- Run flutter doctor -v to investigate whether you have all required dependencies
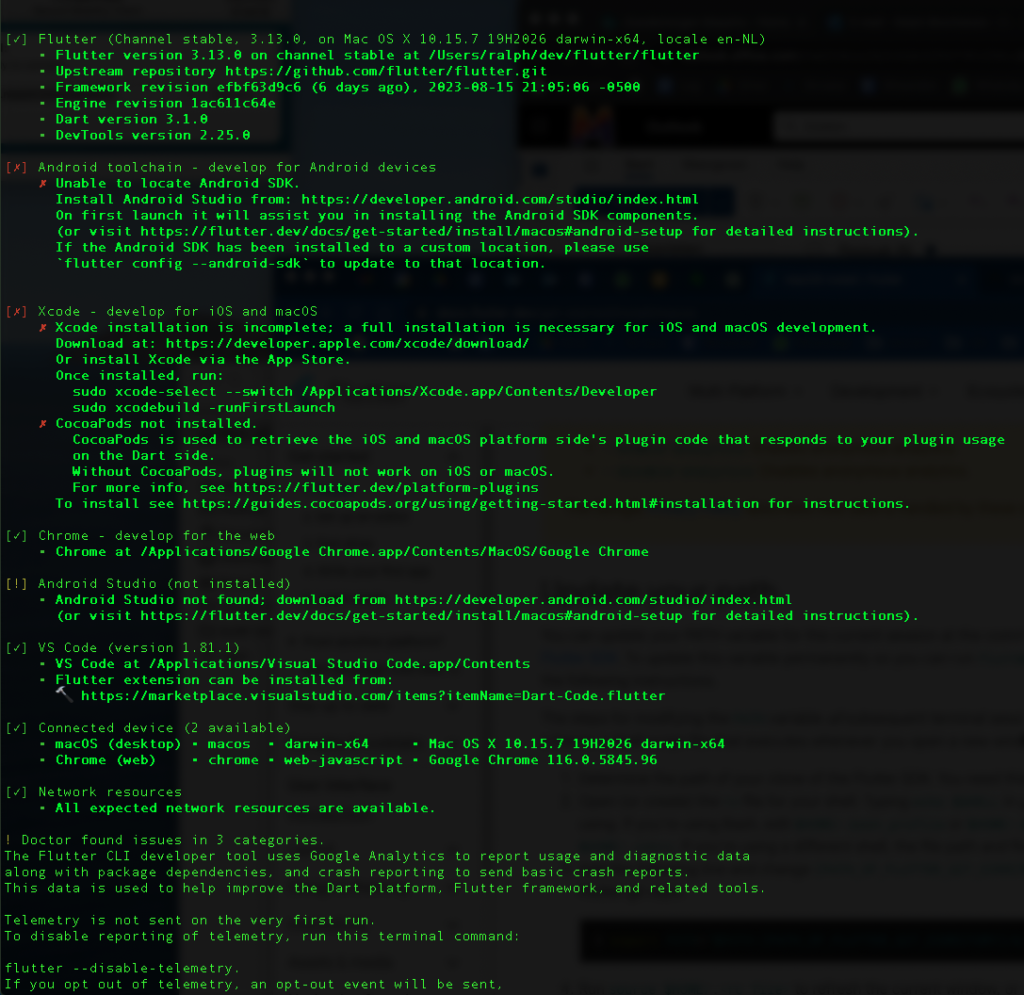
The image above shows what I was missing on my system.
Let’s first install Android Studio by following the suggested link. Upon first launch the tool will also install the Android SDK and components. After you have installed Android Studio and the SDK run flutter doctor -v again. It will complain about missing command-line tools for Android. Follow the suggested link again and install them according to the instructions.
For this you need to first know the exact location of the Android SDK on your system which you can find in Android Studio. You must first create a project before you can access this information. Create a dummy one. The creation dialog will mention installation of the Android SDK. This is probably installed in, for example:
${HOME}/Library/Android/sdk
You can also view this path by going to File > Project Structure and then selecting SDK Location in the left pane. The path is shown under Android SDK location. It will point to the same path as shown above.
When you know the location of the Android SDK, you should set environment variables accordingly, as indicated on the page.
Next, you need the (obsolete) SDK tools as well. Go to Tools > SDK Manager > SDK Tools. Deselect “Hide obsolete packages” and then select the Android SKD Tools (obsolete). Click Apply to install them. You should now have a directory $HOME/Library/Android/sdk/tools (which you didn’t before). In the tools/bin directory there’s the sdkmanager tool which you need to install the command-line tools. However, before you can do THAT you need a Java Runtime. Just install the OpenJDK17U-jdk_x84 from the Adoptium website as shown in another post.
Next, if you run sdkmanager –install “cmdline-tools;latest” you will get a ClassNotFoundException which means you still haven’t installed the Android SDK Command-line Tools (latest) in Android Studio, so start it up again and go to Tools > SDK Manager > SDK Tools and check the Android SDK Command-line Tools (latest) and click Apply. You will now have a directory $ANDROID_HOME/cmdline-tools. Make sure it is in your PATH but BEFORE the tools and tools/bin directories in your PATH.
If you next run flutter doctor -v again, you will see that you still have to accept a few Android licenses. You can do so by running flutter doctor –android-licenses, review each and accept.
Next on the list is Xcode. Install or reinstall it via the App Store. You need a sufficiently updated MacOSX for that (at least 13+). Downloading Xcode for the first time may take a while. It’s 7gb… 🙂
If you’re running an old version of MacOS like Catalina, then you’re shit out of luck because all you can install then is Xcode 12.1 which is too old for Flutter. It requires at least Xcode 14+.
Once download is finished, activate developer mode according to the Flutter doctor instructions using the xcode-select command. Also, run Xcode as first launch using sudo xcodebuild -runFirstLaunch and accept the license agreement.
Next you need CocoaPods as indicated by flutter doctor -v. Follow the instructions. You can this with the MacOS built-in Ruby engine by typing sudo gem install cocoapods BUT that fails on my Macbook Air. After reading SO I installed it via HomeBrew with brew install cocoapods. That seemed to work.
Then last but not least, you can (optionally) install the Flutter plugin for Visual Studio Code by going to
https://marketplace.visualstudio.com/items?itemName=Dart-Code.flutter and installing it.
If you run flutter doctor -v one last time, you should now see no more open issues. You’re ready to go!
Test driving your Flutter installation
In Visual Studio Code go to View > Command Palette and type Flutter: New Project. Then select “Application” and wait while it gets generated. Then in the bottom right corner of VSC you select the right device. It’s set to MacOS by default I think. Select iOS Simulator. That takes a while. You will see an iPhone 14 popping up that’s booting and showing a default layout. Once that’s ready, press F5 to run your auto-generated Flutter boilerplate code. It’s a simple app that allows you to press a “+” button and keeps track of the # times you clicked it. Very boring but it works.
Building your first simple Flutter app
Just check out https://docs.flutter.dev/get-started/codelab